While online learning has quickly advanced as a capacity building solution in the international development space, connectivity challenges continue to plague program implementation. For impact areas struggling with low- or no-bandwidth learning environments, the solution still requires physical travel of trainers to reach the desired intended audience. However, as we’ve reported repeatedly over the last seven years, including with offline-first delivery of Malaria training in Uganda and Nigeria, offline doesn’t have to mean old-school.
For example, TechChange recently partnered with Jhpiego to deliver a landmark course on Maternal and Child Survival Program in Liberia, which provided a blended and offline approach to training over a five-month period. In this post, we’ll share more about how this was accomplished from a technical perspective when it comes to building in Articulate 360. For those unfamiliar with Articulate, it serves as the primary rapid-authoring tool for building courses that can work on any major online learning platform….or even no platform at all! There are five key steps to success:
Step One: Replace Absolute Links with Relative Paths
Publishing Articulates for offline use often means creating a lot of relative paths, which involves a lot of files looking for other files within folders. So, what if you have a large project with many folders (and other Articulate files) linked up by relative paths, but want to deliver a single course file to the client that runs correctly and still “understands” where to find what it needs along its relative paths?
Here’s where Windows shortcuts come in handy. What you’ll need to do is 1) Place all linked Articulate files and documents in a single folder, which you then hide in the delivery folder, and 2) create a shortcut for the course launch file.
Because Windows shortcuts in their default form use absolute paths, you’ll need to make an adjustment to the shortcut in order to have it run on a relative path. The reason why is that absolute paths look for a file starting with the C:// drive of the computer that created the file — so, if you were to deliver an absolute shortcut to a client, the pathway would look for a file on your C:// drive, instead of looking for a file relative to its position in a folder. The beauty of relative paths is that they operate as they should on any desktop; absolute paths won’t work outside of your own desktop.
Step Two: Place All Files and Documents in a Single Folder
Let’s place all linked Articulate files and documents in a single folder, which you then hide in the delivery folder. We’ll take the example of Jhpiego’s MCSP Faculty Development Program, the most recent usage case. Organizationally, this course had a parent Articulate file, the Faculty Development Program, hereafter referred to as FDP. Any user that opened the FDP Articulate could access any of the module Articulates, which were in three series — the TL, AE, and CP series — thanks to relative paths.
When you open the delivery folder, you see this:
Step Three: Hide Your Work!
Notice that the folder “Modules” is a hidden folder, and wouldn’t normally show. To hide a file, right click on the file, click Properties, check the “Hidden” box, then click OK, applying the change to all folders and subfolders. If you’d like for files you’ve hidden to show again, open up the containing folder, click “View” at the top, and then check the box reading “Hidden items” in the Show/Hide category. The file “CLICK HERE TO LAUNCH COURSE” is our shortcut file with a modified relative path and opens the parent course, FDP. Let’s open up that “Modules” folder.
Here we have each of the module folders that open up separate Articulates within the parent Articulate course, FDP. Those folders (the TL, AE, CP folders) contain all the documents that each module needs as well as that module’s Articulate output. The “Output” folder you see is the Articulate output for the parent course, which our shortcut taps into. Now, how do we make that shortcut? Let’s open that “Output” folder.
Step Four: Take a Shortcut
We’ll need the shortcut to hit “Launch_Story.exe,” so we’ll right-click on that and choose “Create shortcut.” Windows will make the shortcut for you, which you can take anywhere and rename as you like. For now, let’s take that shortcut one folder up, out of the hidden folder and into the delivery folder.
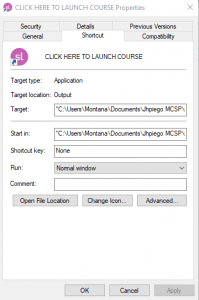
So we’re back here. We’ve renamed our shortcut “CLICK HERE TO LAUNCH COURSE.” Now we need to modify that absolute path into a relative path, so the shortcut knows that no matter what computer it’s on, it needs to go from this folder, into the hidden folder Modules, and into Output to find its “Launch_Story.exe.”
Right-click your new shortcut and choose Properties to modify that path — at the outset, you’ll see this on your screen:
Step Five: It’s All Relative (Paths)
Now, let’s take that absolute path and make it relative. In the “Start in:” field, just delete everything. Then, in the “Target:” field, type in the following, with modifications based on the folder names in your relative path:
%windir%explorer.exe “.Your\Relative\Path\Launch_Story.exe”
The beginning of this should not be in quotes, the only part in quotes is your relative file path. In the case of the FDP course, this would read as follows, since we’re asking the shortcut to look in the same folder at the start for the hidden Modules folder, then telling it to go inside Output to find the Launch_Story.exe for FDP.
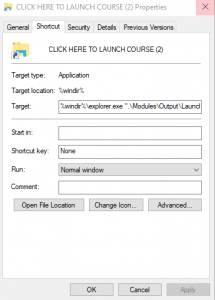
%windir%explorer.exe “.Modules\Output\Launch_Story.exe”
Once you click OK, the icon on the shortcut will change to a folder with a small blue square overlaid on it. If you click Properties again to check out that slick relative path, it should look like this:
You’re done! Now any user will just have to double-click on your newly modified shortcut to launch the course!
If you have any questions or comments (or suggestions for things we may not have thought of!), please feel free to contact me and the TechChange team at: info@techchange.org.


